This post has been hanging around for a while now, waiting. I?ve been meaning to take better pictures of the whole process but since I?m never going to find time for that our hectic home schedule in the foreseaable future, I decided to share them today, my DIY Friday.
This is an easy, no frills way to make miniature trees, shrubs and foliage. There are other ways to make these for your Sylvanian diorama. If you?re still looking for inspiration on how to make your own displays more lifelike and exquisitely detailed, head on over to Carrot Creek Sylvanian Village, where Beverly makes the most beautiful, most elaborate displays all Sylvanian lovers drool over. Just to give you an example, here is a picture from her site, with credit to the original site it appears in:

I?ve also since learned another way to create trees and foliage for my displays, this time, courtesy of the artistic talents of my forum friend Eric of A Calico Town. I love the way he created his own tree using the cardboard from a roll of toilet paper. Not only is it ingenious, it?s earth-friendly! How can you beat eco-friendly beauty? Here is a picture I borrowed from Eric, again with credit for the owner/creator of this lovely photo:

I am thinking of following Eric?s instructions for this tree (you can find more detailed pictures and some intructions here, in case anyone is interested), which would mean possible trips to craft stores and home depots to pick up different sized leaves and flowers. If you?re not too keen on making your own trees and would like, instead, to simply ?plant? ready-made miniature tree, this is the DIY trick I learned from another Sylvanian collector, Joanna of My Sylvanian Collections. (We miss you, Joanna!)
Here are the materials you will need:
- cutter
- scissors
- glue gun
- glue
- any round bottle or canister (different sized)
- styrofoam board
- cardboard (you can use leftover boards from old shirts and underwear)
- hedges and trees
- green flocking (spread it on a paper plate to make application easier; when you?re all done, make a cone of the paper plate and pour the flocking back into a bag or a jar for future use)
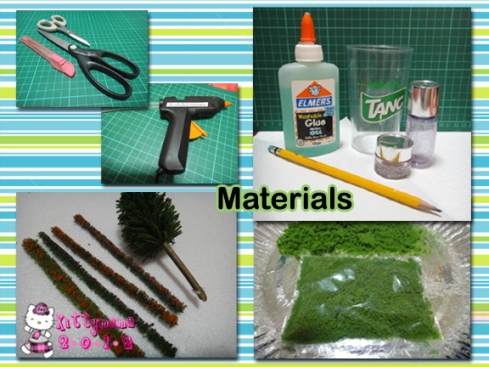
You can purchase trees, shrubs, and hedges?at Deovir, a local arts supplies store, as also the green flocking that you will use as grass.? These are trees used by architectural firms when they make scale models of their projects so you can find lots of different varieties in-store. They?re also relatively inexpensive so you can make lots of them at one time.
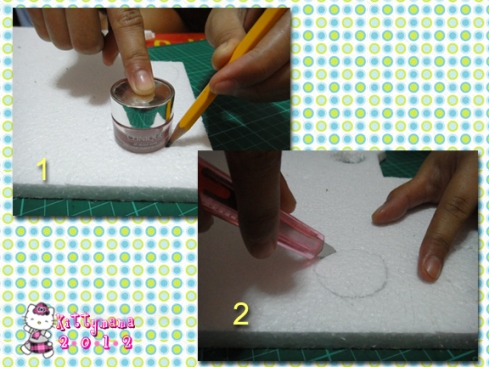
When you?ve prepared all your materials, begin by using one of your round canisters to trace a round shape on your styrofoam board. Cut it using a craft cutter. (For kids, ask an adult to help you with this.)
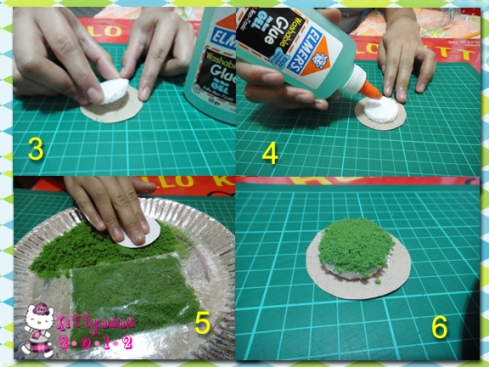
Stick your cut styrofoam circle into a larger circle made of cut-out cardboard (here is where you will need different sizes of canisters and bottles). Spread some glue over the styrofoam circle and gently press it on the green flocking. When you turn it over, you will have covered it completely. Poke your pencil through the center of the circle to make room for your tree.
Using hot glue gun, stick your grass around the sides of the green circle. Do the same for your tree by ?planting? it in the center of the styrofoam circle.
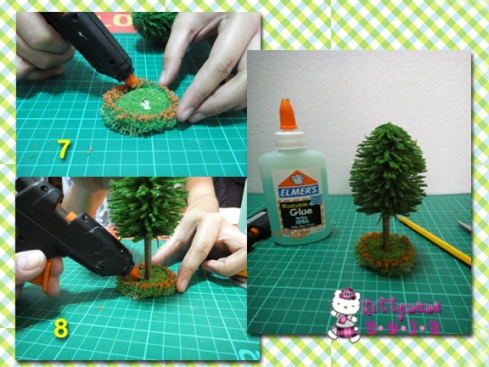
This is how your finished tree (or shrubs) will look like!
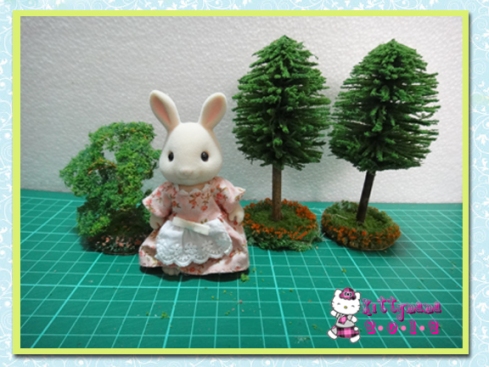
Easy peasy! Have a lovely weekend, folks!
P.S. Don?t forget to drop by the Toy Kingdom Toy Expo at the Mall of Asia SMX from today till Sunday! ![]()

Like this:
Be the first to like this.
Tags: Sylvanian Families, crrafts, Sylvanian crafts
Source: http://okasaneko.wordpress.com/2012/08/24/diy-friday/
heisman finalists heisman finalists kepler 22 b kepler 22 b st nicholas st nicholas mindy mccready
No comments:
Post a Comment
Note: Only a member of this blog may post a comment.